Purpose:
This document includes the following processes,
1. Pricing Changes (Conversion)
2. Multiple MID
3. Dejavoo QSR Setup
4. EBT changes
5. Latest Version Update
6. How to Add the Tax Rate
7.How to Add/Remove the TIP
Download Process on the Terminal After batch out
(Default Password is 1234)
- Press Core Menu
- Utility
- Software Download
- Connect
- Choose Type of Connection (Ethernet or Wi-Fi)
- Input TPN
- Apply updates - Yes
- Once the terminal reads 100% download, press cancels twice in order to reboot the terminal.
If they are connected with a pinpad, they need to take a download too.
Pin pad Encryption Reboot
- On main terminal
- Press Green button
- Go to application
- Credit / Debit / EBT
- Set up
- Pinpad
- It will push an update to pinpad and reboot
1. Pricing changes (Conversion)
Converting into Surcharge Pricing
Note: Ensure the merchants backend pricing was updated to Surcharge before proceeding on the terminal level.
Step 1: Go to the Dejavoo portal.
Step 2: Enter the TPN on the search box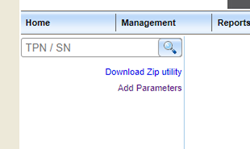
Step 3: A merchant info will appear, verify if it was the desired merchant.
Step 4: In the custom section, enable Parameters to allow us to add the surcharge functionality so it can read the BIN off the card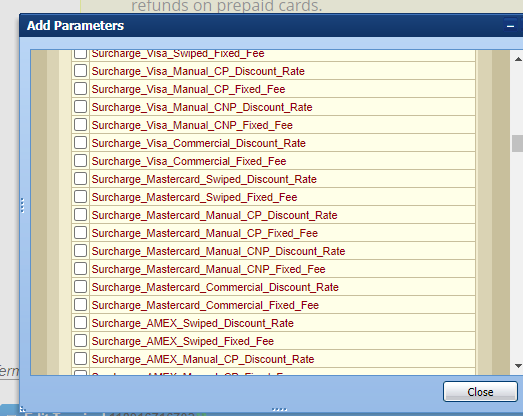
Step 5: Select these fields and edit them to 02900 (Based on discount rate)
Step 6: The Surcharge merchants needs to be updated as per the below snippet.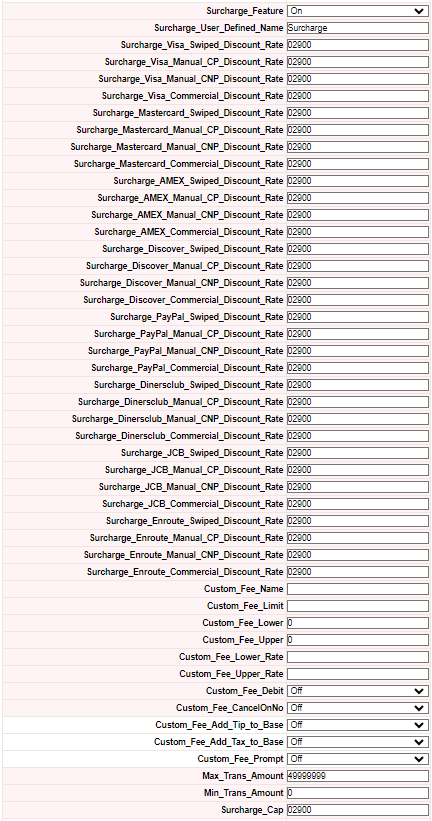
Step 7: Printing on Receipt, enable this parameter 
Step 8: Make sure to set it on.
Step 9: It will now show the surcharge amount on the Receipt.
Tender pricing
In Dejavoo terminal dual pricing is called “ Tender pricing”.
Step 1: Enter the TPN on the Dejavoo portal.
Step 2: Ensure DBA name and MID.
Step 3: When we update the tender pricing, we need a copy of previous file parameter setting so we must download the First tab and the second tab.
Now we have to update the tender pricing. So we need to change some small settings in parameters
Step 4: We must choose In the software model as V3AURACoreF w CrDb_20230308 and the Template based on the business like Restaurant or Retail. (we must ensure that we save the pdf)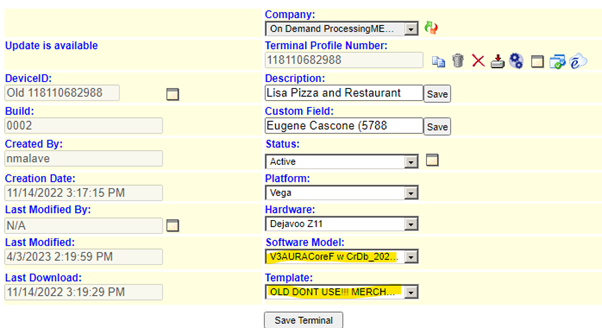
Step 5: After that we should add the parameters in custom.
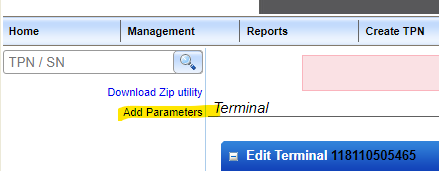
Click → add parameters and select custom.
Once it is opened, search the below mentioned parameters.
1) Custom_fee_print
2) Custom_Fee_Base_Amt_Name
3) Custom_Fee_Total_Amt_Name
Enable these three parameters into this new file.
Step 6:-
- Once we enabled means it showing like,
- Custom_fee_base_amt_name should be default.
- Custom_fee_total_amt_name should be CARD AMT.
- Custom_fee_print should be OFF.
- Dual pricing should be ON.
Step 7:-
- After that we fill in all the details from the saved pdf.
- Once ensure all the parameter settings were the same as the old one before saving the terminal.
- If everything is okay means. We can save the terminal and ask the merchant to do the Download.
2. Multiple MID:
What is the use of having multiple MIDs in the same Dejavoo terminal?
(Ex: TPN - 125900093493)
If that merchant uses the multiple MID in Dejavoo terminal. It will be working with the Same location with a different merchant account, and while doing the transaction, the merchant can change the business-like Retail <->Medical.
How to Create Multiple MID:
Step 1 : Go to DVMMS Portal and get the TPN , and then click on the second Tab 2023030802 - V3AURA_DV_CREDIT_202303… and click on P.V.3.DvCreditApp.02.00.1.2550.DjvL3.WWoo.tar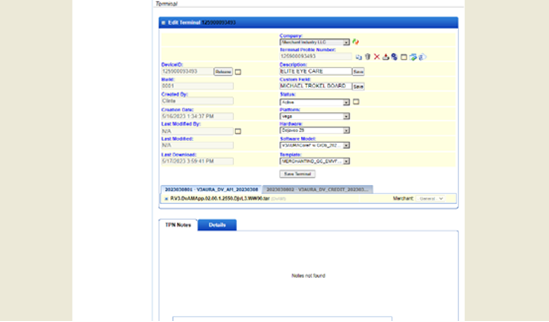
Step 2: Click on the icon next to the “MERCHANT” Drop Down Box 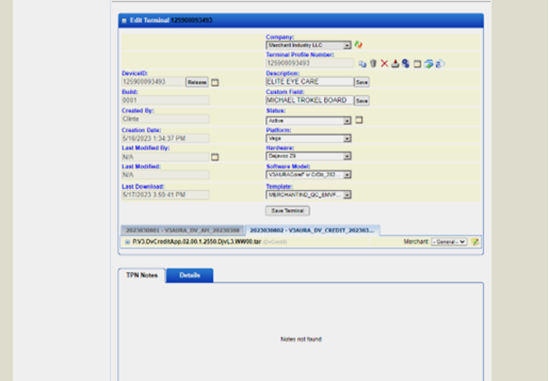
Step 3 : In the “New Merchant” pop-up box input Name for Merchant 1 and click on SAVE, Do this for all merchants using this terminal. Click on CLOSE when after all merchant names have been entered.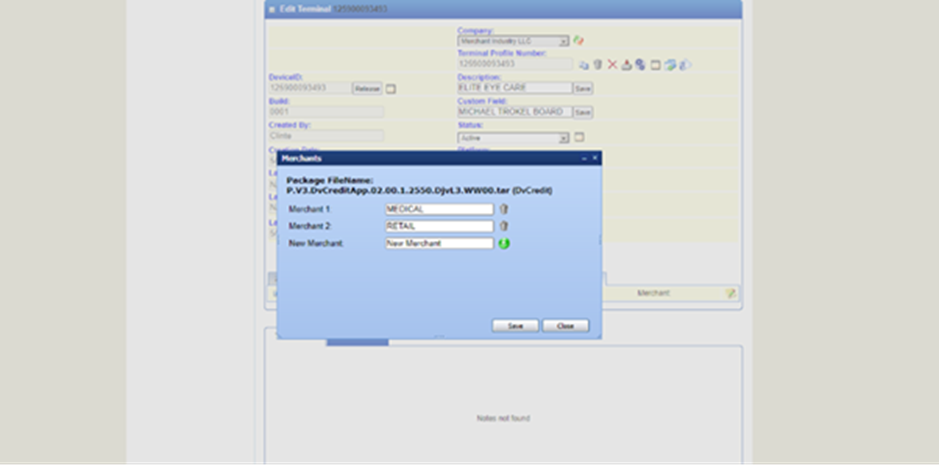
Step 4 : Now that all merchants have been entered click on the Merchant drop-down box to select Merchant #1, expand the parameter sections and enter information specific to merchant #1 i.e.: Header, trailer, MID, etc.
Step 5 : After all parameters have been added for Merchant #1, use the Merchant DROP DOWN BOX to switch to Merchant #2.
Step 6 : Repeat until all parameters have been added for all additional merchants, then click on SAVE TERMINAL.
Step 7 : The system will save the TPN and return to the home page. You will see the last TPN created on the top of the RECENT TERMINALS list on the left side of the page.
Step 8: Once everything is updated properly then ask the merchant to take the download.
Deactivation of Multiple MID in Dejavoo:
Step 1 : Go to DVMMS Portal and get the TPN , and then click on the second Tab 2023030802 - V3AURA_DV_CREDIT_202303… and click on P.V.3.DvCreditApp.02.00.1.2550.DjvL3.WWoo.tar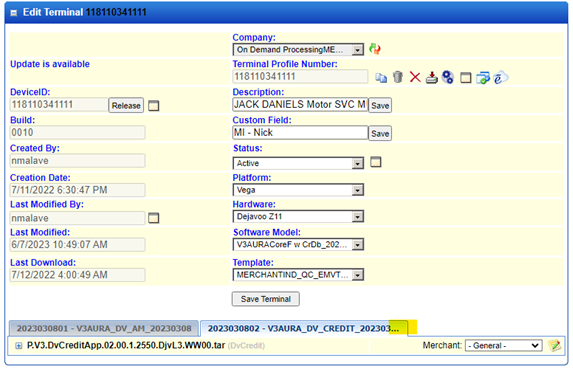
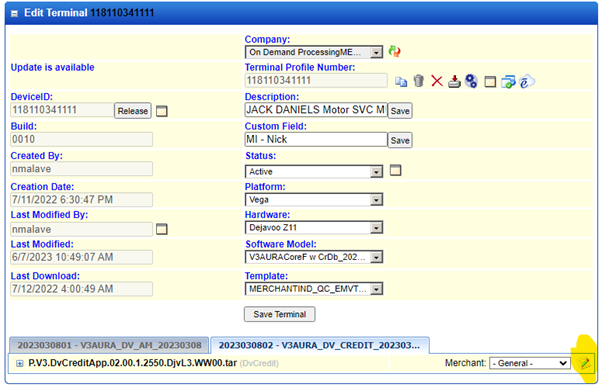
Step 2: Select the “Edit” button next to the General.
Step 3: A new box will open. In that select the delete button for the merchant whose terminal has to be deactivated.
Step 4: Then click on the save button.
3. Dejavoo QSR setup
- Go to “Add Parameters”
- Add the QSR parameters to the file.
- Make sure “QSR_Enabled” is set to “Yes”

- In the QSR tab, select all QSR options.
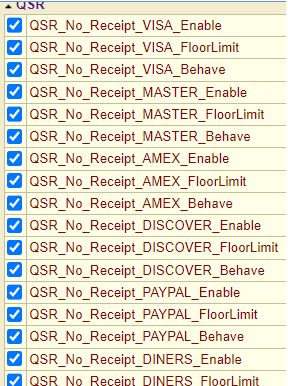
- Select “Close” in the bottom right corner of the popup.
- Depending on whether you want to change the signature or receipt options, select “Yes” next to every QSR option you want to enable, select “No” otherwise.
- The “FloorLimit” is where you set what the merchant wants the cutoff to be when the device will start to either ask for the signature or print a receipt.

There is an invisible decimal point before the last 2 0s. So, the cutoff is set to $100 in the above image.
- On the “Behave” parameters, it is just asking which receipts you want not to print.
- NoBoth – Neither a merchant nor a customer copy will print
- NoCustomer – A merchant receipt will print, customer receipt will not print
- NoMerchant – A merchant copy will not print, customer receipt will print
- PromptForCustomer – A merchant copy will not print A prompt will appear on screen asking whether you want to print the customer copy.
4. EBT Changes on the Dejavoo terminal 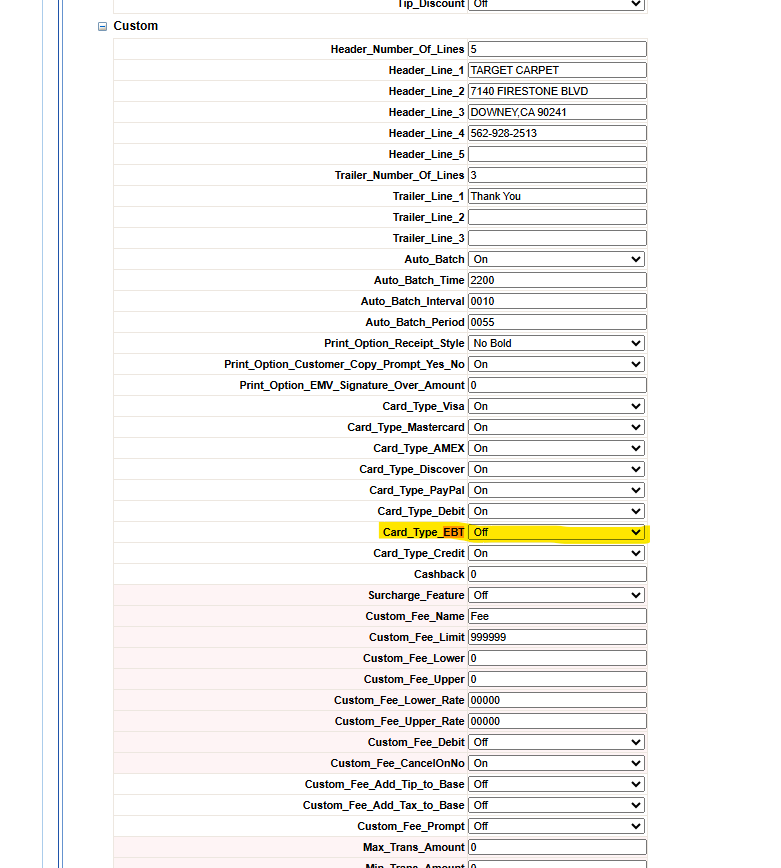
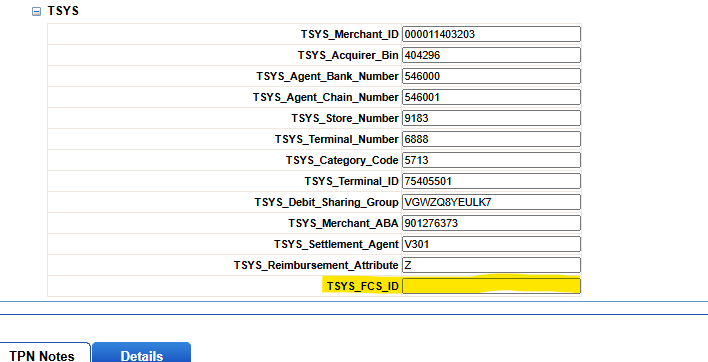
1. If EBT needs to be added for the merchant, the Card_Type_EBT option must be enabled, and the TSYS_FCS_ID must be updated with the FNS number and save changes
2. If EBT needs to be removed from the merchant account, the Card_Type_EBT option must be disabled, and the TSYS_FCS_ID should be removed save changes.
3. After updating the parameters, the merchant should download the updated configuration.
5. The latest version updates on the Dejavoo terminal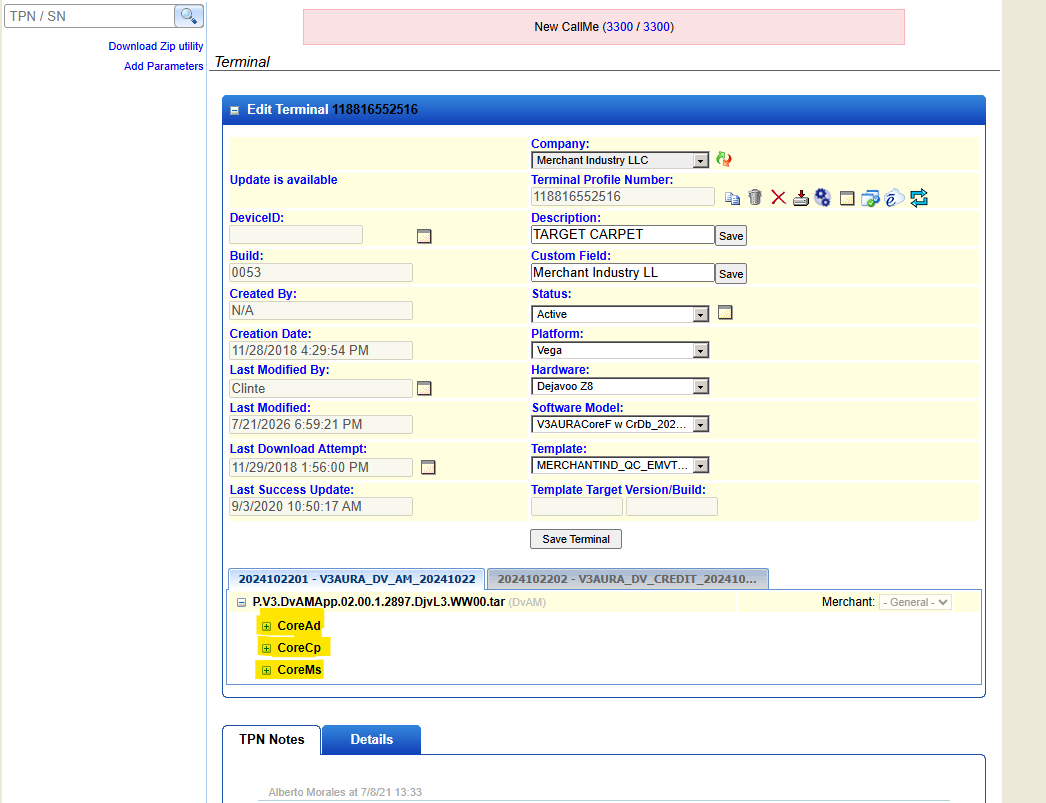
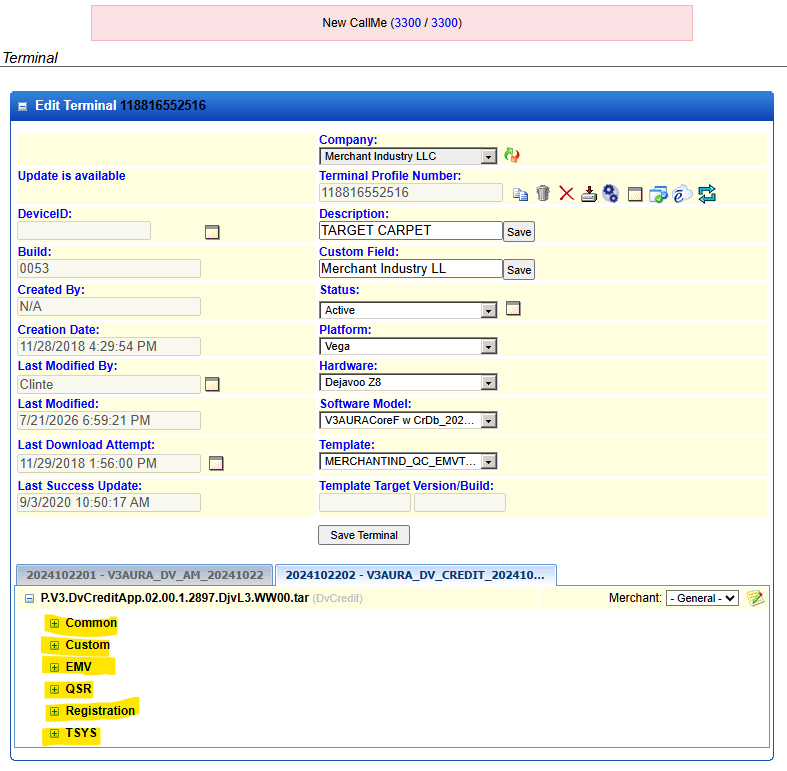
1. If it is an old version, find the latest version before updating. After identifying the new version, copy the parameters by extracting the highlighted parameters from the screenshot above.
2. After copying all parameters, update the version. Once the version is updated, all parameters will be removed, so manually enter all parameters using the previously copied data and save the changes. After updating to the new version, took download the updated version.
before, we didn't do it if the PIN pad was enabled (KMS-Version--1). But we need to do it if the KMS version is even 1 or 2.
3. We only do not update if the original pin pad- Dejavoo Z6 like that
(We do not update the latest version for the PinPad terminal alone. KMS version-1 means, it's just the PinPad option enabled in that Dejavoo terminal)
6. How to Add the Tax rate on the terminal
1. Open up the DVMS portal and find the TPN → Go the Credit file section → Custom —> Make the below changes.
2. As per ISO we need to update the %, If they are not provided, we have to take from google based on states.
- Auto _ Tax _ State (XXX%)
Example: Tax 8.875% – the rate should be update like that “08875”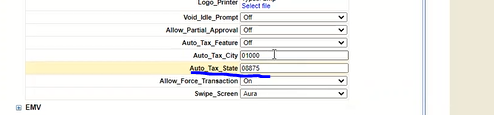
7. How to add/remove the TIP suggestion on the terminal
1. Open up the DVMS portal and find the TPN → Go the Credit file section → Common—> Make the below changes
- TIP MODE should be “OFF ”

Was this article helpful?
That’s Great!
Thank you for your feedback
Sorry! We couldn't be helpful
Thank you for your feedback
Feedback sent
We appreciate your effort and will try to fix the article